
1959 British Grand Prix
The fourth round of the 1959 Formula 1 World Championship took place on 18 July in Great Britain, at the Aintree circuit, which, in the alternating sequence, replaced Silverstone this year. In the two years since the last visit of the Grand Prix circus, the track layout had undergone no changes, still measuring 4.828 km in length, while drivers faced the challenge of completing 75 laps.

In the interval between the French and British events, the Grand Prix world was thrown into turmoil by a dispute between the Scuderia Ferrari and one of their principal drivers, Jean Behra. Forced to retire at Reims with engine trouble after an impressive rise from the tail of the field, Behra, in a fit of temper, accused the team of sabotage — a remark which, as might be expected, did not escape the Commendatore’s notice and resulted in the Frenchman’s prompt dismissal.

Meanwhile, as journalists speculated over who would replace Behra for the British round, an even more sensational piece of news broke: the Maranello team would not appear at Aintree at all, owing to a nationwide metalworkers’ strike that had swept across the Italian peninsula — marking Ferrari’s first absence from a World Championship Grand Prix since 1950. The news was, of course, manna from heaven for championship leader Jack Brabham and the Cooper team, who, after Ferrari’s commanding one-two in France, had begun to feel the scarlet cars breathing down their necks. For the Grand Prix organisers, however, Ferrari’s withdrawal came as an unwelcome surprise, so, to fill the gap and maintain public interest, they decided to greatly expand the entry list, admitting Formula 2 machinery alongside the Formula 1 cars. As a result, no fewer than 30 drivers were entered, most of them British, as one might expect.
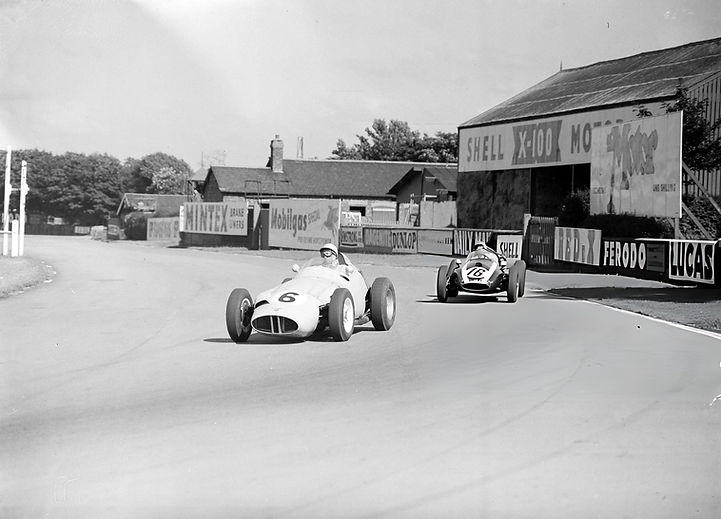
The works team of John Cooper was, as usual, represented by their three regular drivers — Jack Brabham, Masten Gregory, and Bruce McLaren — all driving Cooper T51 cars equipped with 2.5-litre Climax engines.

Another identical Cooper T51, entered by Rob Walker’s private team, was entrusted to Maurice Trintignant, while Walker’s other driver, Stirling Moss, once again opted to compete in the pale-green BRM of the British Racing Partnership team.

Alfred Owen’s works team, as on previous occasions, fielded their usual trio of Jo Bonnier, Harry Schell and Ron Flockhart — all of them being supplied with identical BRM P25 cars.

Meanwhile, Colin Chapman’s team saw a reshuffle: still not recovered from his crash at the non-championship Rouen Grand Prix, Innes Ireland relinquished his Lotus 16 to the team’s reserve driver, Alan Stacey, who consequently lined up alongside Graham Hill.

Moreover, after skipping the previous round, the Aston Martin DBR4s reappeared in the Silverstone paddock: David Brown’s team, understandably, would not forego their home Grand Prix, and their familiar duo of Carroll Shelby and Roy Salvadori were back at the wheel.


Following Salvadori’s return to the Aston Martin cockpit, his seat in Tommy Atkins’ Cooper T43 was taken by none other than British veteran Jack Fairman. Besides, the British Grand Prix also saw four Maserati-powered entries: two Cooper T51s from Scuderia Centro Sud for Ian Burgess and Hans Herrmann, a Maserati 250F of the same team driven by Fritz d’Orey, and a lone JBW run by private driver Brian Naylor. Yet the most enthusiasm among the spectators was naturally stirred by the reappearance of last year’s Constructors’ Cup winner, Vanwall. Having missed the opening three championship rounds, Tony Vandervell seized the chance to return to Grand Prix racing, bringing two upgraded VW cars to his home track, now featuring a lower driver position and a new, lighter body.

The sole Vanwall entry was none other than Tony Brooks, who, unable to race for Ferrari, nonetheless secured a place in his home Grand Prix by rejoining his former team.

As for the Formula 2 contingent, it was largely made up of Cooper T51, T45, and T43 cars, fielded by BRP drivers Ivor Bueb and Chris Bristow, as well as a number of private drivers: Trevor Taylor, Mike Taylor, Henry Taylor, Peter Ashdown, Keith Green, Bill Moss, and Tim Parnell.

Additionally, two drivers, Dennis Taylor and David Piper, opted to start in a Lotus 12 and 16 respectively, while Mike Parkes brought to the track an exotic rear-engined car with a semi-monocoque chassis, designed by David Fry.

At the same time, it should be noted that all of the aforementioned Formula 2 cars were powered by 1.5-litre Climax engines, except for the BRP entries, which were fitted with Borgward power units.
Qualification
With a hefty entry list and only 24 grid spots available, qualifying for the British Grand Prix was a tense affair. Matters were made worse by the fact that only Friday’s times counted, while Thursday’s practice had been ruined by torrential rain, leaving drivers little chance to get to grips with the circuit. Nevertheless, even under these conditions, the field bettered the two-year-old benchmarks, and ultimately the fastest lap — 1’58.0 — was claimed jointly by Jack Brabham and Roy Salvadori!

And if for the Australian, who set the time first and thus claimed the first pole position of his career, starting from the front row had already become a familiar occurrence this season, then Roy Salvadori’s pace caught everyone off guard, providing clear evidence of David Brown’s team’s significant progress.

Meanwhile, the other Cooper and Aston Martin drivers also showed solid form: Gregory set the 5th-fastest time, Shelby 6th, while McLaren took 8th. As for Trintignant, who was driving Walker’s Cooper, he did not disappoint either, taking 4th place, a result matched by Harry Schell, who was this time the fastest of the BRM drivers. By contrast, Alfred Owen’s other drivers fared less impressively: Bonnier and Flockhart took only 10th and 11th, while Moss, driving an identical car, also struggled and ended up no higher than 7th.

Team Lotus also had little to celebrate: Graham Hill’s best effort secured only 9th on the grid, while Stacy, contesting just his second Grand Prix, qualified 12th at all. However, the biggest disappointment of qualifying was undoubtedly Vanwall: no matter how hard Brooks tried, he simply could not get his car up to speed and, ending up more than four seconds short of his own two-year-old benchmark, the Englishman was forced to settle for only 17th place on the grid.

Meanwhile, among the Formula 2 drivers, the fastest was Chris Bristow of BRP, who managed 16th overall, while six other F2 entrants — Trevor Taylor, Tim Parnell, Dennis Taylor, Mike Parkes, Keith Green, and Bill Moss — were less fortunate, falling at the first hurdle and failing to qualify for the race.

Race
Despite another round of heavy downpour earlier in the race day, the weather had cleared completely by the start, allowing spectators to enjoy the traditional parade of drivers in white Austin-Healeys, who warmly returned the public’s applause with smiles and waves.

As the parade lap came to an end and the drivers settled into their cockpits, the grandstands grew hushed with suspense, every eye in the crowd focused on the starting line…

Start. At the wave of the national flag, the cars roar off the line, with Brabham making the best getaway from the front row and immediately seizing the lead! Yet the real hero of the opening moments is Bonnier: starting from the fourth row, the Swede rockets up to 3rd position, instantly finding himself among the frontrunners!

At the same time, for the Aston Martin drivers, the opening lap was nothing short of disastrous: Salvadori immediately falls back to 9th, and Shelby to 13th! Meanwhile, Herrmann’s and Piper’s cars wouldn’t budge at all; the German got going only after a shove from his mechanics and rejoined the chase mere seconds behind the pack, while Piper’s Lotus had to be revived in the pits, which left the Englishman hopelessly adrift from the very first lap.
Lap 1. Fighting in the lower midfield, Fairman makes a mistake and spins across the track, immediately dropping to the very back of the pack! Herrmann, for his part, overcomes his tardy getaway in remarkable fashion: before the opening lap is completed he has not only rejoined the pack but has already disposed of d’Orey!

Position after Lap 1: Brabham, Schell, Bonnier, Gregory, Trintignant, Moss, McLaren, Graham Hill, Salvadori, Stacey.
Lap 2: Moss wastes no time whatsoever: on the second lap he is already past Trintignant to seize 5th!

Meanwhile, Aston Martin’s woes are piling up fast: spotting a fuel leak, Shelby immediately pulls into the pits — only to discover that the alarm was caused by nothing more than overfilled tanks! Cleared to go, Carroll charges back out — but the damage is already done: the American rejoins nearly at the very back of the field!

Lap 3: Facing the same problem as his teammate, Salvadori in turn heads into the pits, and after exchanging a few words with the team manager Reg Parnell, he is immediately instructed to continue the race. However, even those few seconds are enough for several rivals to speed past, and as a result Roy gets back to the track in only 13th! Meanwhile, at the back of the field, Herrmann continues his charge, and after overtaking Burgess, Bueb, and Mike Taylor, the German moves up to 17th!

Lap 4: After losing time in the pits, Shelby pushes hard to recover lost ground and storms past two rivals – Bueb and Mike Taylor – in just one lap!

Lap 5: Salvadori also begins to regain lost positions, effortlessly overtaking Brooks, whose Vanwall is struggling in the race just as it did in qualifying.

Also on this lap, Flockhart moves past Naylor in the battle for 10th.

Lap 6: Taking the lead, Brabham pulls ahead confidently, while the real action is unfolding just behind him: six drivers — Schell, Bonnier, Gregory, Moss, Trintignant, and McLaren — are tangled in a fierce fight for second place, and this lap sees the Swede fall back, opening the door for Gregory and Moss to surge ahead!

Also on this lap, Flockhart edges past Stacey, while Shelby keeps storming forward, passing three competitors at once: Herrmann, Burgess, and Henry Taylor!

Lap 7: After overtaking Bonnier, Moss quickly closes in on Gregory and, with a decisive move, passes the American to break into the top three!

Meanwhile, Salvadori also keeps up the pressure, passing Naylor and Stacey to move into the top ten!

Besides, after a less-than-impressive start to the race, Burgess seems to find his pace and regains a position by overtaking Henry Taylor.

Lap 8: Stacey keeps dropping down the order and, after letting Naylor through, finds himself already in 12th! Meanwhile, one of magnetos fails in Shelby’s Aston Martin, causing a noticeable loss of power, but even with the weakened engine, the American manages to overtake Bristow and gain another position!

Lap 9: After spending a couple of laps behind Schell, Moss finally spots an opening and dives through, snatching second place with a bold maneuver!

Also on this lap, Burgess overtakes his teammate Herrmann in the fight for 16th, while Fairman, having finally caught up with the rest of the field, leaves Ashdown behind.
Lap 10: Gregory’s Cooper starts overheating, and the American, powerless to defend, is overtaken in quick succession by Bonnier, Trintignant, and McLaren!

At the same time, taking advantage of the turmoil, Trintignant wastes no time and slips past Bonnier, snatching 4th from the Swede! Also on this lap, Burgess gains another position, moving ahead of Bristow.

Position after 10 laps: Brabham, Moss, Schell, Trintignant, Bonnier, McLaren, Gregory, Graham Hill, Flockhart, Salvadori.
With clear track ahead of him, Moss immediately sets off in pursuit of Brabham — but the Australian has already stretched his advantage to a full 13 seconds!

Lap 11: Having just lost out to Trintignant, Bonnier finds himself under pressure again — this time from the young McLaren, who boldly dives past and snatches the points position from the Swede!

Also on this lap, Graham Hill misjudges the final corner, sliding out onto the grass; even so, he recovers smoothly and resumes the race still holding his position in the pack.

Meanwhile, at the back of the field, the order shifts again as Fairman sweeps past two more rivals — Mike Taylor and d’Orey — to claim 20th place.

Lap 12: Catching up to his next rival — this time Flockhart — Salvadori launches a decisive attack and confidently overtakes the Scotsman, gaining yet another position!

Lap 13: After a frankly lackluster race, Brooks finally heads into the pits with a misfiring engine — a disappointing conclusion to Vanwall’s ill-fated comeback to the World Championship.

Lap 14: After dispatching Flockhart, Salvadori wastes no time reeling in Graham Hill — and slips past immediately to take 8th!

Meanwhile, Naylor, running eleventh, suffers transmission issues and is forced to pit, immediately dropping to the very back of the field.
Lap 15: After shadowing Schell for a couple of laps, Trintignant finally seizes his chance, overtaking the American and moving into the top three!

Meanwhile, Salvadori’s bold advance suddenly falters as Graham Hill strikes back, pushing the Aston Martin driver back again!

Lap 16: Having overtaken Schell, Trintignant gets no breathing room — the American immediately hangs on his tail, determined not to give up third!

Meanwhile, all of Salvadori’s attempts to repass Graham Hill are met with such fierce defense from the Lotus driver that Roy, losing his patience, even utters a few sharp words at his fellow countryman!

Lap 17: Desperately trying to pass Hill, Salvadori practically bumps his car right up to the Lotus’ tail, yet Graham remains unimpressed, standing his ground with steady composure!

Lap 18: After three laps in Hill’s slipstream, Salvadori finally spots an opening and surges past, giving Graham no chance to fight back!

Also on this lap, his teammate Shelby mirrors the move, sweeping past another Lotus driver, Stacey, to claim 11th, while Fairman also makes further progress, moving ahead of Henry Taylor.

As for Mike Taylor, Henry’s namesake, his day is already done: the transmission on his Cooper failed and that was that.
Lap 19: Having only managed a few laps after his pit stop, Naylor returns to the pits — this time for good, as his transmission has finally failed.
Lap 20: Hermann’s clutch gives way, causing him to lose pace rapidly, and three cars rush past the German without hesitation!

At the same time, being one of the three to slip past the German, Fairman also snatches a position from Bueb, thus moving up to 15th! Meanwhile, on this very lap the field shrinks once more as Piper’s Lotus suffers an engine failure.
Position after 20 laps: Brabham, Moss, Trintignant, Schell, McLaren, Bonnier, Gregory, Salvadori, Graham Hill, Flockhart.
Despite Moss’ best efforts, he simply cannot keep up with Brabham, and the gap between them stretches further, now reaching 16 seconds!

Lap 21: Locked in their duel, Trintignant and Schell fail to notice McLaren rapidly reeling them in — and moments later, the New Zealander is breathing down their necks!

Lap 22: It takes McLaren barely a lap to deal with Schell, and in an instant the New Zealander is shadowing Trintignant, ready to pounce!

Meanwhile, after struggling for a couple of laps with a failing clutch, Herrmann eventually heads to the pits to retire — the gearbox on his Cooper has packed up.
Lap 24: Moss sets the fastest lap of the race — 1:58.6 — but even that barely dents Brabham’s advantage, the Australian giving up only four-tenths!

Meanwhile, with relentless attacks in almost every turn, young McLaren finally forces his way past Trintignant — and thus Bruce charges into the top three!

At the same time, taking advantage of the New Zealander’s move, Schell seizes his opportunity as well and leaves the Frenchman behind!

Lap 25: Furious by the loss of two positions, Trintignant immediately strikes back at Schell, forcing the American down to 5th!

Meanwhile, with a comfortable lead over Graham Hill, Salvadori closes in on Gregory, and after a thrilling duel moves up to 7th!

Lap 26: Even with an overheating engine, Gregory refuses to give in — he strikes back immediately, regaining 7th from Salvadori!

Lap 27: Coming up to the last turn, the tightly packed trio of McLaren, Trintignant, and Schell catch lapped Henry Taylor, who wisely steers off the track to avoid trouble!
Lap 28: Having lost a couple of seconds of his advantage, Brabham immediately responds to Moss, blasting in a record lap of 1:57.8!

Meanwhile, Hill’s Lotus begins to falter, and the Englishman becomes an easy target for Flockhart, who sweeps past him to claim 9th.

Position after 30 laps: Brabham, Moss, McLaren, Trintignant, Schell, Bonnier, Gregory, Salvadori, Flockhart, Graham Hill.
After 30 laps, Brabham remains firmly in command, keeping Moss at a safe 15-second margin!

Lap 32: Another driver falls victim to a transmission failure — this time, it is Burgess' turn to retire.
Lap 34: In the heat of their fierce duel, Gregory and Salvadori close in on Bonnier - and by attacking in succession, they push the Swede down to 8th!

Lap 36: During another attack, Salvadori overshoots Anchor Crossing, and Bonnier seizes the opportunity to slip past and regain the lost position!

Lap 37: The Swede’s joy is short-lived — another attack from Salvadori sees him reclaim the spot!

Lap 38: Bonnier’s hopes of even finishing the race are dashed in an instant — a broken throttle linkage finally takes the Swede out of contention.

Lap 39: After more than twenty laps of a fierce duel with Trintignant, Schell launches another attack — and he makes it through!

Meanwhile, Hill’s Lotus is clearly struggling: the Englishman drops further in pace and concedes another position to Shelby!

Lap 40: Trintignant doesn’t take long to respond — he counterattacks Schell and pushing the American back again!

Meanwhile, Fairman’s impressive charge comes to nothing — Jack heads into the pits with a faulty gearbox, marking yet another retirement in this intense race.
Position after 40 laps: Brabham, Moss, McLaren, Trintignant, Schell, Gregory, Salvadori, Flockhart, Shelby, Graham Hill.
Pushing his car to the limit, Moss chips away at Brabham’s lead by a few tenths each lap, but it is clearly not enough — the gap between them still stands at a hefty 12 seconds!

Lap 41: The thrilling battle between Trintignant and Schell comes to a sudden end — a second-gear failure in Maurice’s Cooper lets the American slip past without resistance!

However, defeating the Frenchman is the best the BRM driver can hope for today — while he was locked in battle with Trintignant, McLaren had already vanished into the distance!
Lap 50: Having reduced his gap to Brabham to 10 seconds, Moss finally heads into the pits for a new left rear tire — the intense chase is taking its toll on the BRM’s wheels. The crew gets the tire change done in a swift 30 seconds, putting Stirling back on track still ahead of McLaren, but now his gap to Brabham has already stretched to nearly 50 seconds!

At the same time, seeing that Moss no longer poses a threat, the Cooper crew immediately relay the news to their frontrunner, urging him to ease off a little and look after the rear tires.

Lap 54: Struggling to keep control in a cockpit smeared with oil, Flockhart makes a mistake at Village Corner — his BRM spins, catches a wheel in the ditch, and immediately stalls! Climbing out, Ron can do nothing but shrug in resignation while the field loses another competitor.

Lap 58: After running more than 50 laps with an overheating engine, Gregory finally heads to the pits to top up the water — and by the time he's back out, both Aston Martins have swept past!

Meanwhile, d’Orey’s fading brakes betray him at Anchor Crossing - his car plows right into the straw bales, sufferring serious damage, and thus the Brazilian joins the growing list of retirements — the tenth so far.

Lap 59: Moss is still chasing the impossible — he attacks with everything he’s got and equals Brabham’s best time of the race: 1:57.8!

Position after 60 laps: Brabham, Moss, McLaren, Schell, Trintignant, Salvadori, Shelby, Gregory, Graham Hill, Stacey.
Lap 63: Hill is in real trouble now — his pace drops so much that even rookie teammate Stacey sweeps past with ease!

Lap 65: With his tyres badly worn, Schell also begins to lose pace and he in turn dives into the pits for a new left-rear wheel. At the same time, as with Moss earlier, the BRM crew performs flawlessly, and the American rejoins the race still holding on to 4th.

Lap 66: Running on the last drops of fuel, Bristow drags his car into the pits, gets a swift refuel, and gets back to the track without even losing his class-leading position!

Lap 67: Moss suddenly runs out of fuel as well and is forced to dive into the pits for a second unscheduled stop! Even a quick 20-second refuel isn’t enough to keep Stirling in second — McLaren blasts past him before he can even react!

Lap 68: Frustrated by the loss of second place, Moss immediately chases after the young New Zealander and, before the lap is out, reclaims his position, putting things back in order!
Lap 69: Trying to pull away from the Cooper, Moss sets a new fastest lap of the race — 1:57.0 — yet McLaren refuses to let go, hanging onto him like a shadow!

Lap 70: With only five laps to go, Shelby’s Aston Martin loses its second magneto, and, powerless, the American pulls into the pits, robbed of any chance to see the chequered flag.

Lap 71: Moss drives his BRM to the absolute limit, trying to shake off McLaren, yet the young New Zealander holds on tenaciously - and even launching a counterattack down the main straight!

Final Lap: Having led the race from the very start, Brabham rounds the final corner and takes his second Grand Prix victory of the year!

Thanks to the points earned, Jack significantly strengthens his lead in the championship, while his main rival Brooks leaves the event empty-handed, with the heavy feeling that this setback could prove costly at the end of the season.

Yet, as remarkable as the Australian’s performance was, the final lap’s spotlight was entirely on the breathtaking battle for 2nd between Moss and McLaren ... and in the end, it was Stirling who crossed the finish line first, narrowly beating Bruce by just 0.2 seconds! Both drivers, however, deserve top accolades: Stirling finally earns his first podium of the season, while McLaren celebrates his maiden podium in his career. Additionally, by equaling Stirling’s best result on the final lap, Bruce shares the fastest lap with the Englishman, which results in extra half-point for both of them. Meanwhile, fourth place goes to Schell, who finally scores his first points of the season, while Trintignant takes fifth, a solid result given his gearbox issues. For Aston Martin, however, the day is a bitter disappointment: after an excellent qualifying, Salvadori settles for only sixth place, leaving David Brown’s team empty-handed at their home track.

Interesting facts:
- Jack Brabham's first pole-position;
- Bruce McLaren's first podium and fastest lap.
Driver standings

Constructor standings

Alternative GP results
